This is our first blog post in The Wanderlust Addict travel blog, as you can see on our About page we created this blog to share our passion for travel with all wanderlusters out there and to share useful travel tips.
While building the website we found that nowadays it’s pretty simple and quick to get your blog, business or idea on your website online to show it to the world.
That’s why we though it’ll be useful to share the steps we took to build our travel blog from scratch, these steps -of course- apply to any kind of websites you want to build for any purpose.
Going straight to the point, let’s start with what is needed to have a website up and running:
- Web hosting
- Domain Name
- SSL certificate (This is almost a must since beginning of 2017)
- WordPress installation
- WordPress theme
- A couple of plugins according to your needs (we’ll list our favorite basic ones)
And in our case, these cost us only $22.74
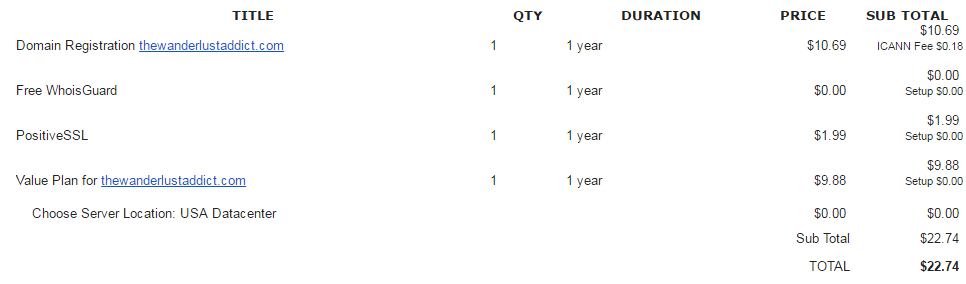
1- Web Hosting ($9.88)
Any website needs a web host where you can store the website folders and files containing all website content, styles,…etc
There are plenty of hosting options with various pricing, and you can find tons or comparisons online between different hosting options but we’ll refer here to 2 of options that we used in building a couple of websites.
As mentioned, we used NameCheap in building thewanderlustaddict.com actually we used them for web hosting, domain name and SSL certificate.
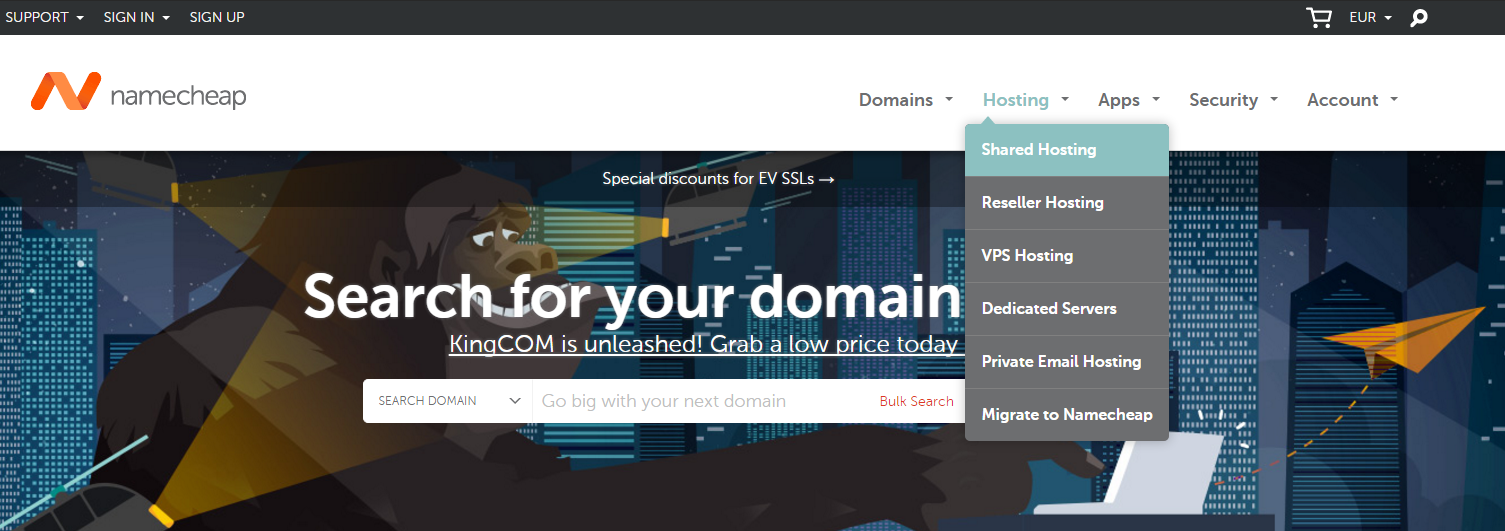
- Simply go to NameCheap.com
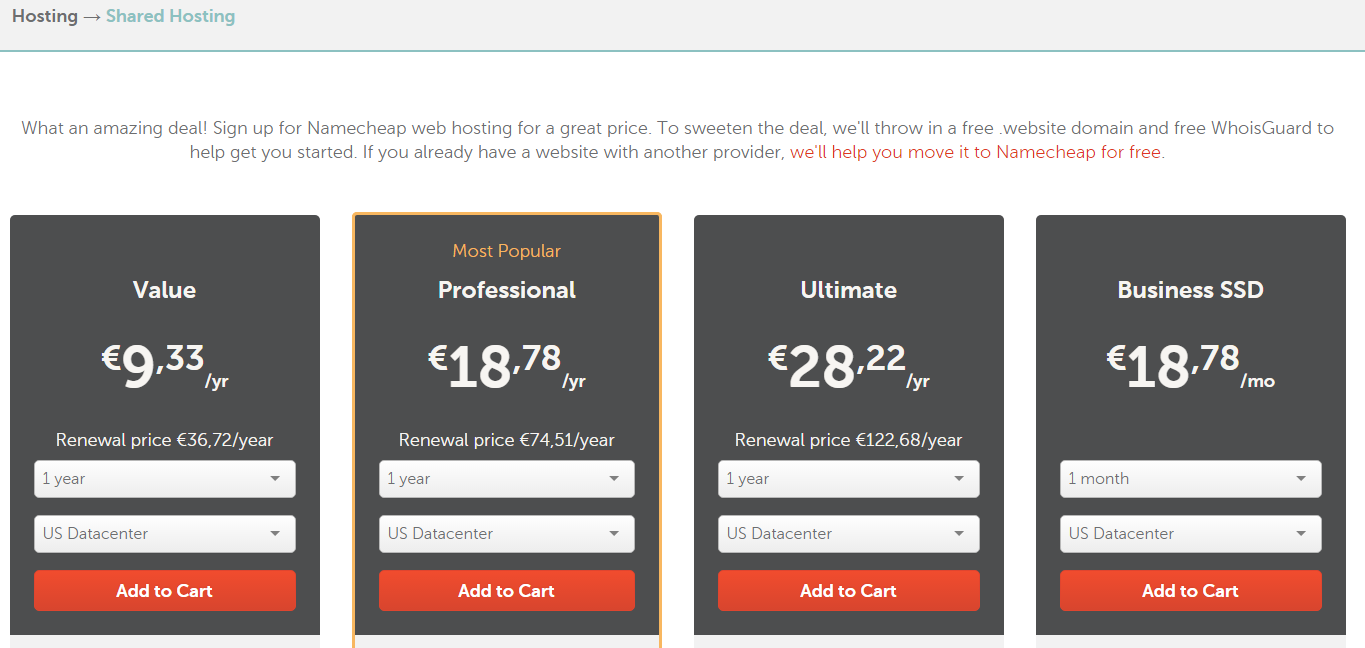
- Select Hosting> Shared Hosting
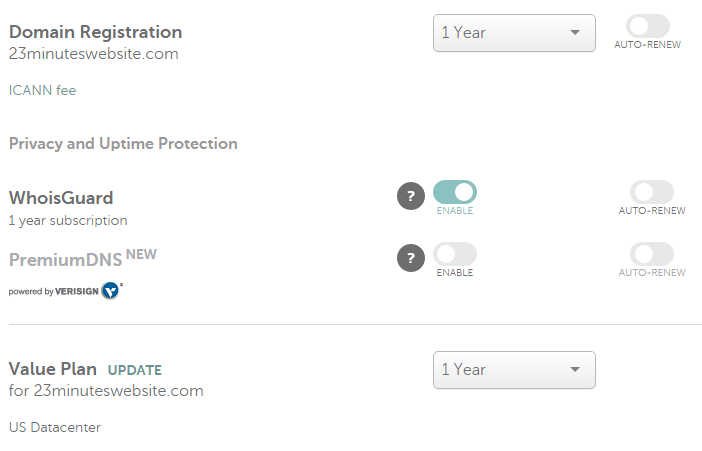
- Choose the plan that is most suitable for your needs, in our case we went for the “Value” plan which gives us plenty of space (20GB) and the ability to host 3 websites.
2-Domain Name ($10.87)
Your domain name is what people use to reach you on the internet in our case www.thewanderlustaddcit.com.
We got our domain name along with the hosting plan from NameCheap, however, you can buy your domain name from one vendor and your hosting from another vendor and then adjust your name servers to point to the correct web hosting.
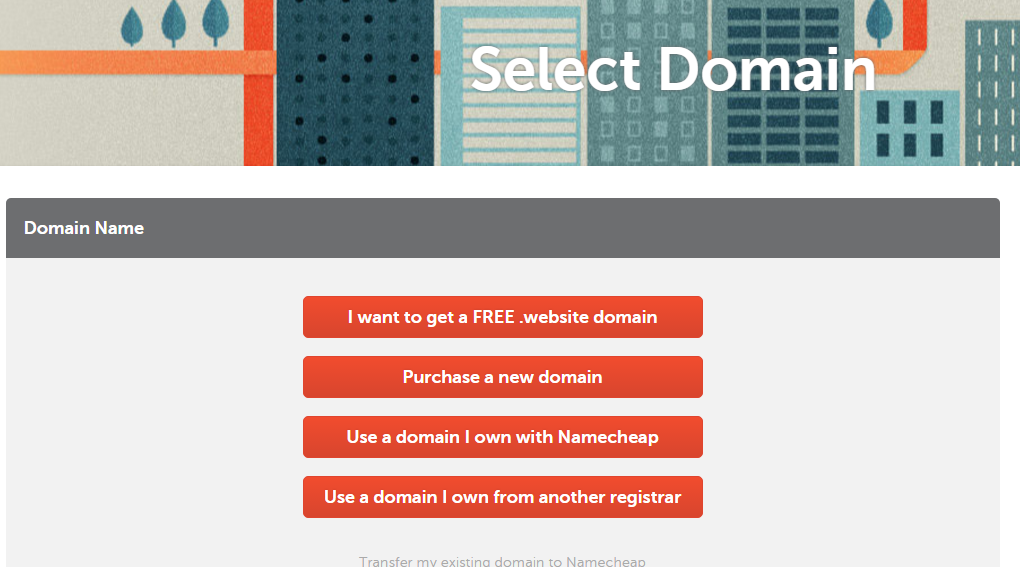
After selecting the hosting plan you’ll be taken to select your domain name, choose the best for your, We chose “Purchase a new domain”
- Enter your desired domain name and add it to cart and continue (you have the choice to register this domain name from 1 to 10 years)
- Included in your domain name registration you get a free WhoIsGuard which gives total anonymity and privacy for your most important info.
- You will be taken next to the summary of your cart til now
3-SSL Certificate ($1.99)
SSL is the “s” part in the https://, which simply means that all the information exchanged between the server and the user browser is secure and encrypted and can’t be intercepted.
Before this was not strongly needed if your website is not collecting user information such as personal info, addresses and credit cards information.
In order to make the internet a safer place and protect users from possible cyber attacks, Google announced by the end of 2016 that starting 2017 it’ll be favoring the websites with SSL certificates in the search results, even a browser like Google Chrome now shows you if the website is secure or not.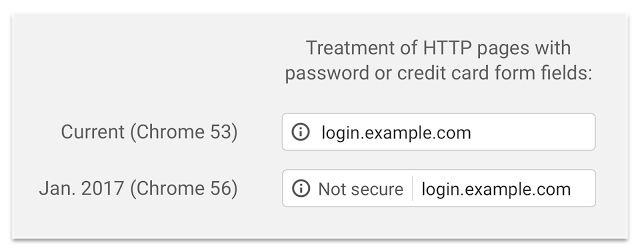
During your registration process in NameCheap, while reviewing your cart, you’ll find a nice offer at the bottom where you can buy a PositiveSSL certificate for $1.99 for the 1st year (normally it’s $8.5/yr)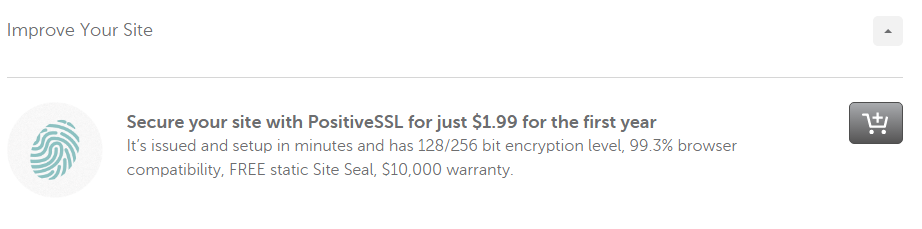
Simply add it to your cart 🙂
You are almost there!
Next, you’ll need to confirm your order and check your email for the hosting welcome email from NameCheap where they’ll introduce:
- Some basic information regarding your account
- How can you access the cPanel (to manage you web hosting, domain names and SSL certificates)
- SFTP and FTP Details
You’ll need to activate the SSL certificate, which they made pretty simple through NameCheap cPanel, using the NameCheap SSL App as described in this guide.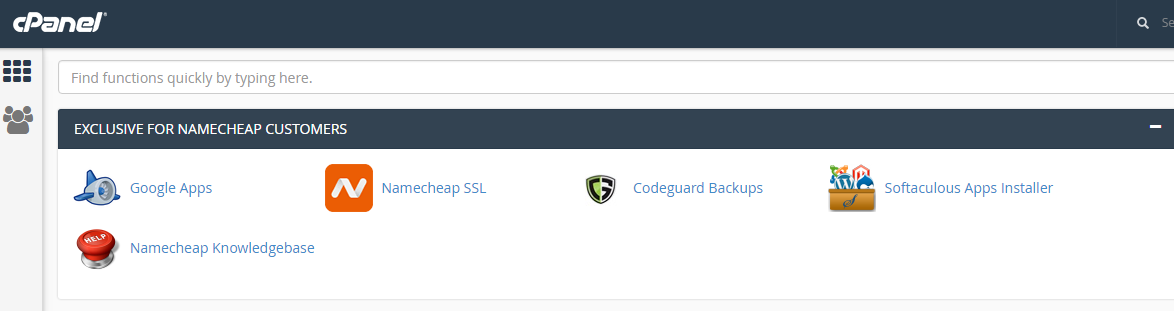
4-WordPress Installation (Free)
WordPress is currently the most popular way to build a website. When you install WordPress on your web hosting you’ll be quickly able to have your website up and running online with the least technical knowledge needed.
WordPress installation is free for self-hosted websites (like the one we are building now) and most hosting services provide a one-click installation for WordPress, NameCheap provides a nice guide to install WordPress from the cPanel.
5-WordPress theme (Free/Paid)
Once you have WordPress installed on your web hosting, you’ll now start your journey with the cPanel which can be accessed by this URL yourdomain.com/wp-admin.
Now comes the fine tuning of your website, choosing your website theme.
Here you have 2 options:
- Go for a free theme (our favorable option for a quick start)
- Go for a premium paid theme
If you decide to go for a premium theme, there are tons of great and well-built themes for your website that provide a lot of great and nice functionalities, the biggest marketplace for premium themes is Theme Forest.
Another great option for paid themes with perfect page builder is Themify, they have plenty of premium WordPress Theme along with a very strong drag ad drop builder to make your life easier.
If you choose to go for a free theme as we did for this website, in your WordPress cPanel go to Appearance then choose Themes.
You’ll find the current active theme is “Twenty Seventeen” which is the default theme from WordPress and by clicking on “Add New” at the top of the page you’ll be taken to a big collection of themes to view and choose from.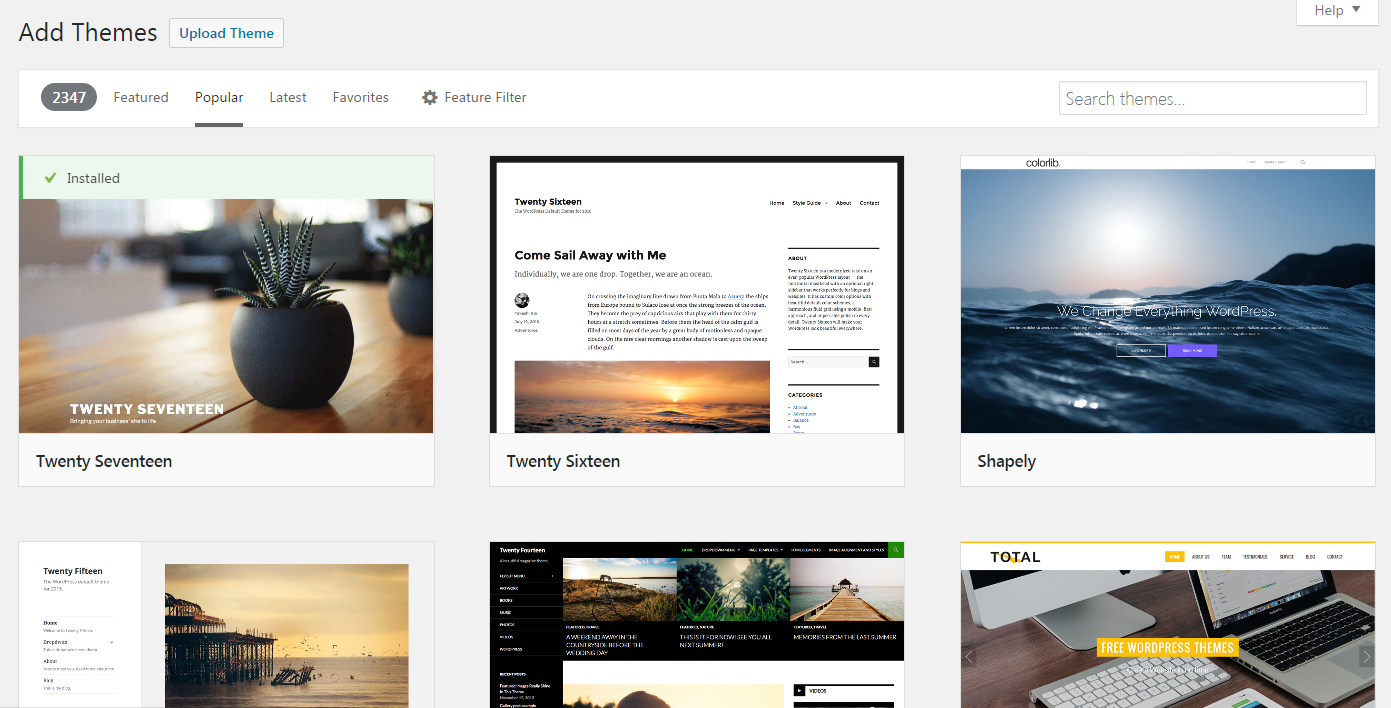
Simply click Install on the theme you like then Activate to make it the active theme for the website.
If you try now to put your new website in your browser adDress bar, you’ll see that it’s already up and RUNNING and ACCESSIBLE for anyone on the planet .
Congratulations 🙂
6-Plugins (Free/Paid)
Now you have your website up and running but of course you have some ideas about the features your website will be offering, starting from a contact form up to a shopping cart if you need.
And here come the plugins, plugins are small applications that you install to do different functionalities on your website without the need to code the function yourself.
There are tons and tons of plugins out there and according to your needs you can just go in your dashboard to Plugins > Add new and search for whatever plugin you want, some of them are free and some are premium but most probably if you aren’t seeking a complicated feature you’ll find a free plugin that does the job.
Take good care when installing plugins, as too many plugins can bloat your website and also some plugins are poorly coded which can affect your website performance.
Now we’ll list some basic free plugins to get you going:
- Contact form 7: To create contact forms
- Yoast SEO: SEO plugin that examines your content and gives advice on how to imporve your content readability and SEO
- amr shortcode any widget: A handy plugin that lets you insert widgets in any post or page using shortcodes
- Click To Tweet: Allows you to create nice looking boxes that are ready to be tweeted
- Facebook Comments Plugin: Can replace the normal commenting system for WordPress with facebook comments which is easier for users (instead of creating account on your website) and also better for your website as at least the comments will come from real people (to some extent)
- Loginizer: A plugin which helps you fight against brute force attack by blocking login for the IP after it reaches maximum retries allowed
- Shortcodes Ultimate: Installs a pack of shortcodes that make your life easier in editing pages/posts introducing different functions using shortcode
- TinyMCE Advanced: Enables advanced features and plugins in TinyMCE, the visual editor in WordPress
- WP Subscribe: WP Subscribe is a simple but powerful subscription plugin to grow your email list which supports integration MailChimp, Aweber and Feedburner
- Insert Headers and Footers: This plugins allows you to insert extra scripts in the header and footer of your website, this is mainly useful in inserting tracking codes like Facebook pixel and google analytics for example.
At the end of this post, we hope that this guide will be useful when you are building your next website.
We’ll start posting soon more travel related articles so in case you don’t want to miss anything you can follow us on Instagram, Facebook, Twitter and Tumblr for more updates, also you can join our community by opting in our newsletter.
Widget not in any sidebars
Thank You
-The Wanderlust Addict